


To estimate the concrete strength using the maturity method, you need to make a maturity calibration.
The aim of performing a maturity calibration is to find the relationship between time, temperature, and strength for each concrete mix design that you intend to use. This relationship is called the strength-maturity relationship and is established in a laboratory.
Once you have found the strength-maturity relationship for your specific concrete mix, you can use this to estimate the in-place strength of the concrete at your job site.
The procedure for making a proper maturity calibration is well described in the ASTM C1074 standard practice. We recommend you to read this and become familiar with all the details on how to make a successful calibration.
Prepare at least 15 samples so that you are able to perform tests at minimum five different test ages. Three samples are needed for each test age, two for the actual tests and the third in case the difference between the two first test results is higher than 10% from their average.
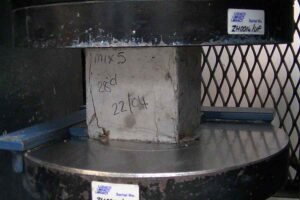
The samples must be prepared according to standard procedures for making and curing concrete test samples in the laboratory or in the field.
Embed temperature sensors in at least two of the samples. The sensors must be placed within ±15 mm of the center.
Connect a data logger or transmitter to the temperature sensors as soon as possible. These will record the temperature history, which will be used to calculate the maturity.
Once the samples have been prepared, cure all of them according to standard procedures and under the same conditions, e.g. in a water bath or moist room.
It is important to have the same curing conditions for all the samples in order to obtain a correct correlation between the strength and maturity.
For the first test age, break two samples and note down the compressive strength for each of them. Also note down the date and time. Finally, calculate the average strength for the samples.
Find the related maturity value at the time of the compression tests. When you have determined the maturity for each of the instrumented samples, calculate the average maturity of these.
You have now determined the strength-maturity relationship for your first test age. This consists of:
Now find the strength-maturity relationship for the remaining test ages by repeating the last three steps above.
Test age | Maturity (days at 20 °C) | Strength (MPa) |
|---|---|---|
1 | 1 | 10 |
2 | ||
3 | ||
4 | ||
5 |
Once you are finished with all the test ages, gather the results in a table. Each test age shows the correlation between the average compressive strength and the average maturity.
Test age | Maturity (days at 20 °C) | Strength (MPa) |
|---|---|---|
1 | 1 | 10 |
2 | 3 | 18 |
3 | 7 | 23 |
4 | 14 | 26 |
5 | 28 | 30 |
Plot the maturity vs. strength for each test age and create the best fitting curve.
You can now use the maturity calibration to estimate the in-place strength of the concrete at your job site.
Read our Estimate In-field Concrete Strength with the Maturity Method article to learn more.
If you want to see a step-by-step explanation about how to make a maturity calibration using Maturix:
If you use Maturix In-Situ:
If you use Maturix In-Situ:
Get in contact with
Casper Harlev
| Cookie | Type | Duration | Description |
|---|---|---|---|
| __cf_bm | 30 minutes | This cookie, set by Cloudflare, is used to support Cloudflare Bot Management. | |
| __Host-GAPS | 2 years | This cookie allows the website to identify a user and provide enhanced functionality and personalisation. | |
| __hssc | 30 minutes | HubSpot sets this cookie to keep track of sessions and to determine if HubSpot should increment the session number and timestamps in the __hstc cookie. | |
| __hssrc | session | This cookie is set by Hubspot whenever it changes the session cookie. The __hssrc cookie set to 1 indicates that the user has restarted the browser, and if the cookie does not exist, it is assumed to be a new session. | |
| __hstc | 1 year 24 days | This is the main cookie set by Hubspot, for tracking visitors. It contains the domain, initial timestamp (first visit), last timestamp (last visit), current timestamp (this visit), and session number (increments for each subsequent session). | |
| _fbp | 3 months | This cookie is set by Facebook to display advertisements when either on Facebook or on a digital platform powered by Facebook advertising, after visiting the website. | |
| _ga | 2 years | The _ga cookie, installed by Google Analytics, calculates visitor, session and campaign data and also keeps track of site usage for the site's analytics report. The cookie stores information anonymously and assigns a randomly generated number to recognize unique visitors. | |
| _ga_RLNWVZCCTJ | 2 years | This cookie is installed by Google Analytics. | |
| _gat_gtag_UA_49231349_2 | 1 minute | Set by Google to distinguish users. | |
| _gat_UA-49231349-2 | 1 minute | A variation of the _gat cookie set by Google Analytics and Google Tag Manager to allow website owners to track visitor behaviour and measure site performance. The pattern element in the name contains the unique identity number of the account or website it relates to. | |
| _gcl_au | 3 months | Provided by Google Tag Manager to experiment advertisement efficiency of websites using their services. | |
| _gid | 1 day | Installed by Google Analytics, _gid cookie stores information on how visitors use a website, while also creating an analytics report of the website's performance. Some of the data that are collected include the number of visitors, their source, and the pages they visit anonymously. | |
| _GRECAPTCHA | 5 months 27 days | This cookie is set by the Google recaptcha service to identify bots to protect the website against malicious spam attacks. | |
| _pk_id.2.8459 | 1 year 27 days | No description | |
| _pk_ref.2.8459 | 6 months | No description | |
| _pk_ses.2.8459 | 30 minutes | No description | |
| ajs_anonymous_id | never | This cookie is set by Segment to count the number of people who visit a certain site by tracking if they have visited before. | |
| ajs_group_id | never | This cookie is set by Segment to track visitor usage and events within the website. | |
| ajs_user_id | never | This cookie is set by Segment to help track visitor usage, events, target marketing, and also measure application performance and stability. | |
| AnalyticsSyncHistory | 1 month | No description | |
| bcookie | 2 years | LinkedIn sets this cookie from LinkedIn share buttons and ad tags to recognize browser ID. | |
| bscookie | 2 years | LinkedIn sets this cookie to store performed actions on the website. | |
| connect.sid | 1 month | This cookie is used for authentication and for secure log-in. It registers the log-in information. | |
| CONSENT | 2 years | YouTube sets this cookie via embedded youtube-videos and registers anonymous statistical data. | |
| cookielawinfo-checkbox-advertisement | 1 year | Set by the GDPR Cookie Consent plugin, this cookie is used to record the user consent for the cookies in the "Advertisement" category . | |
| cookielawinfo-checkbox-analytics | 1 year | Set by the GDPR Cookie Consent plugin, this cookie is used to record the user consent for the cookies in the "Analytics" category . | |
| cookielawinfo-checkbox-functional | 1 year | The cookie is set by the GDPR Cookie Consent plugin to record the user consent for the cookies in the category "Functional". | |
| cookielawinfo-checkbox-necessary | 1 year | Set by the GDPR Cookie Consent plugin, this cookie is used to record the user consent for the cookies in the "Necessary" category . | |
| cookielawinfo-checkbox-others | 1 year | Set by the GDPR Cookie Consent plugin, this cookie is used to store the user consent for cookies in the category "Others". | |
| cookielawinfo-checkbox-performance | 1 year | Set by the GDPR Cookie Consent plugin, this cookie is used to store the user consent for cookies in the category "Performance". | |
| CookieLawInfoConsent | 1 year | Records the default button state of the corresponding category & the status of CCPA. It works only in coordination with the primary cookie. | |
| debug | never | No description available. | |
| elementor | never | This cookie is used by the website's WordPress theme. It allows the website owner to implement or change the website's content in real-time. | |
| fr | 3 months | Facebook sets this cookie to show relevant advertisements to users by tracking user behaviour across the web, on sites that have Facebook pixel or Facebook social plugin. | |
| hubspotutk | 1 year 24 days | HubSpot sets this cookie to keep track of the visitors to the website. This cookie is passed to HubSpot on form submission and used when deduplicating contacts. | |
| IDE | 1 year 24 days | Google DoubleClick IDE cookies are used to store information about how the user uses the website to present them with relevant ads and according to the user profile. | |
| lang | session | LinkedIn sets this cookie to remember a user's language setting. | |
| li_gc | 2 years | No description | |
| lidc | 1 day | LinkedIn sets the lidc cookie to facilitate data center selection. | |
| loglevel | never | No description available. | |
| loom_anon_comment | session | No description available. | |
| loom_referral_video | session | No description | |
| NID | 6 months | NID cookie, set by Google, is used for advertising purposes; to limit the number of times the user sees an ad, to mute unwanted ads, and to measure the effectiveness of ads. | |
| PHPSESSID | session | This cookie is native to PHP applications. The cookie is used to store and identify a users' unique session ID for the purpose of managing user session on the website. The cookie is a session cookies and is deleted when all the browser windows are closed. | |
| test_cookie | 15 minutes | The test_cookie is set by doubleclick.net and is used to determine if the user's browser supports cookies. | |
| UserMatchHistory | 1 month | LinkedIn sets this cookie for LinkedIn Ads ID syncing. | |
| VISITOR_INFO1_LIVE | 5 months 27 days | A cookie set by YouTube to measure bandwidth that determines whether the user gets the new or old player interface. | |
| vuid | 2 years | Vimeo installs this cookie to collect tracking information by setting a unique ID to embed videos to the website. | |
| YSC | session | YSC cookie is set by Youtube and is used to track the views of embedded videos on Youtube pages. | |
| yt-remote-connected-devices | never | YouTube sets this cookie to store the video preferences of the user using embedded YouTube video. | |
| yt-remote-device-id | never | YouTube sets this cookie to store the video preferences of the user using embedded YouTube video. | |
| yt.innertube::nextId | never | This cookie, set by YouTube, registers a unique ID to store data on what videos from YouTube the user has seen. | |
| yt.innertube::requests | never | This cookie, set by YouTube, registers a unique ID to store data on what videos from YouTube the user has seen. |
| Cookie | Duration | Description |
|---|---|---|
| __cf_bm | 30 minutes | This cookie, set by Cloudflare, is used to support Cloudflare Bot Management. |
| __hssc | 30 minutes | HubSpot sets this cookie to keep track of sessions and to determine if HubSpot should increment the session number and timestamps in the __hstc cookie. |
| bcookie | 2 years | LinkedIn sets this cookie from LinkedIn share buttons and ad tags to recognize browser ID. |
| bscookie | 2 years | LinkedIn sets this cookie to store performed actions on the website. |
| lang | session | LinkedIn sets this cookie to remember a user's language setting. |
| lidc | 1 day | LinkedIn sets the lidc cookie to facilitate data center selection. |
| UserMatchHistory | 1 month | LinkedIn sets this cookie for LinkedIn Ads ID syncing. |
| Cookie | Duration | Description |
|---|---|---|
| __hstc | 1 year 24 days | This is the main cookie set by Hubspot, for tracking visitors. It contains the domain, initial timestamp (first visit), last timestamp (last visit), current timestamp (this visit), and session number (increments for each subsequent session). |
| _ga | 2 years | The _ga cookie, installed by Google Analytics, calculates visitor, session and campaign data and also keeps track of site usage for the site's analytics report. The cookie stores information anonymously and assigns a randomly generated number to recognize unique visitors. |
| _ga_RLNWVZCCTJ | 2 years | This cookie is installed by Google Analytics. |
| _gat_gtag_UA_49231349_2 | 1 minute | Set by Google to distinguish users. |
| _gat_UA-49231349-2 | 1 minute | A variation of the _gat cookie set by Google Analytics and Google Tag Manager to allow website owners to track visitor behaviour and measure site performance. The pattern element in the name contains the unique identity number of the account or website it relates to. |
| _gcl_au | 3 months | Provided by Google Tag Manager to experiment advertisement efficiency of websites using their services. |
| _gid | 1 day | Installed by Google Analytics, _gid cookie stores information on how visitors use a website, while also creating an analytics report of the website's performance. Some of the data that are collected include the number of visitors, their source, and the pages they visit anonymously. |
| ajs_anonymous_id | never | This cookie is set by Segment to count the number of people who visit a certain site by tracking if they have visited before. |
| ajs_group_id | never | This cookie is set by Segment to track visitor usage and events within the website. |
| ajs_user_id | never | This cookie is set by Segment to help track visitor usage, events, target marketing, and also measure application performance and stability. |
| CONSENT | 2 years | YouTube sets this cookie via embedded youtube-videos and registers anonymous statistical data. |
| hubspotutk | 1 year 24 days | HubSpot sets this cookie to keep track of the visitors to the website. This cookie is passed to HubSpot on form submission and used when deduplicating contacts. |
| vuid | 2 years | Vimeo installs this cookie to collect tracking information by setting a unique ID to embed videos to the website. |
| Cookie | Duration | Description |
|---|---|---|
| __Host-GAPS | 2 years | This cookie allows the website to identify a user and provide enhanced functionality and personalisation. |
| _fbp | 3 months | This cookie is set by Facebook to display advertisements when either on Facebook or on a digital platform powered by Facebook advertising, after visiting the website. |
| fr | 3 months | Facebook sets this cookie to show relevant advertisements to users by tracking user behaviour across the web, on sites that have Facebook pixel or Facebook social plugin. |
| IDE | 1 year 24 days | Google DoubleClick IDE cookies are used to store information about how the user uses the website to present them with relevant ads and according to the user profile. |
| NID | 6 months | NID cookie, set by Google, is used for advertising purposes; to limit the number of times the user sees an ad, to mute unwanted ads, and to measure the effectiveness of ads. |
| test_cookie | 15 minutes | The test_cookie is set by doubleclick.net and is used to determine if the user's browser supports cookies. |
| VISITOR_INFO1_LIVE | 5 months 27 days | A cookie set by YouTube to measure bandwidth that determines whether the user gets the new or old player interface. |
| YSC | session | YSC cookie is set by Youtube and is used to track the views of embedded videos on Youtube pages. |
| yt-remote-connected-devices | never | YouTube sets this cookie to store the video preferences of the user using embedded YouTube video. |
| yt-remote-device-id | never | YouTube sets this cookie to store the video preferences of the user using embedded YouTube video. |
| yt.innertube::nextId | never | This cookie, set by YouTube, registers a unique ID to store data on what videos from YouTube the user has seen. |
| yt.innertube::requests | never | This cookie, set by YouTube, registers a unique ID to store data on what videos from YouTube the user has seen. |
| Cookie | Duration | Description |
|---|---|---|
| _pk_id.2.8459 | 1 year 27 days | No description |
| _pk_ref.2.8459 | 6 months | No description |
| _pk_ses.2.8459 | 30 minutes | No description |
| AnalyticsSyncHistory | 1 month | No description |
| debug | never | No description available. |
| li_gc | 2 years | No description |
| loglevel | never | No description available. |
| loom_anon_comment | session | No description available. |
| loom_referral_video | session | No description |