Before the calibration
Requirements:
- Access to the Maturix Precast Web Portal
- Two Maturix transmitters and type K thermocouples
- These must be visible under “Sensors” in the web portal
- Sigfox coverage at the place of calibration
Preparations in the Web Portal
Step 1: Log in to the Maturix™ Precast Web Portal at app.maturix.com with your user account
Step 2: First we need to add a concrete mix for calibration purposes:
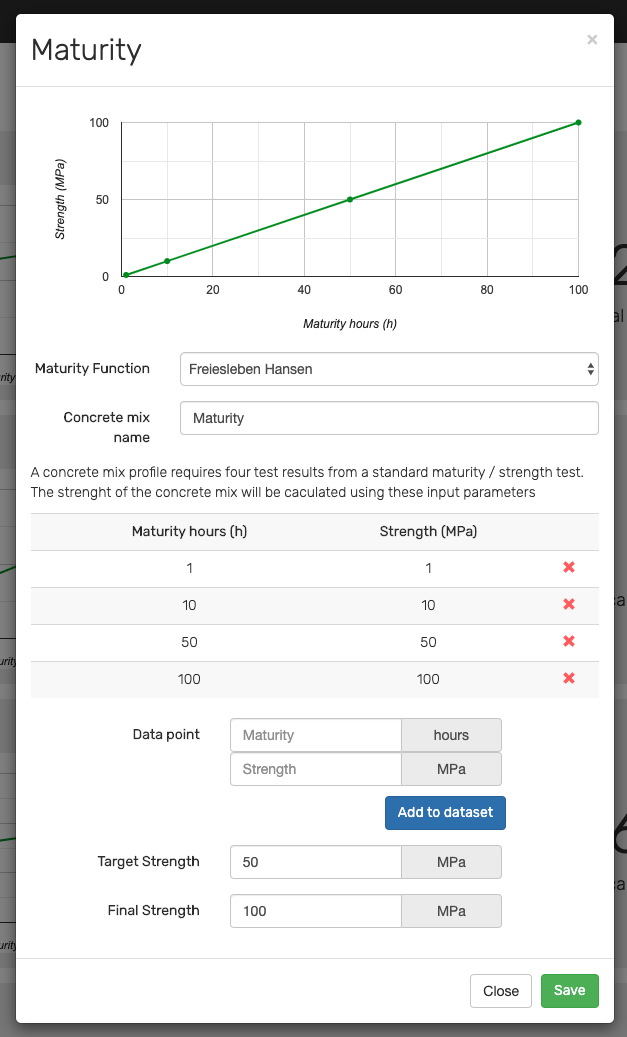
- Click on “Concrete Mixes” in the menu and then click on “New concrete mix” in the top right corner. Fill out the pop-up box:
- Maturity Function: Choose your desired maturity function
- Concrete mix name: Call it “Maturity”
- Add four data points that have the same value in strength and maturity by writing the values below in the fields and clicking “Add to dataset”:
- 1 – 1
- 10-10
- 50-50
- 100-100
- Target Strength: Write 50
- Final Strength: Write 100
- Click “Save” – and you now have a concrete mix called “Maturity”
Step 3: Next, we need to add a zone with two workstations for calibration purposes:
- Click on “Facility” in the menu
- Click on “Edit facility” in top right corner
- Click on “New zone” in top right corner
- In the pop-up enter the following:
- Name: Calibration
- Width: 1
- Length: 1
- Click on “Save changes”
- In the newly created “Calibration” zone click on the button “Add workstation”
- In the pop-up enter the following:
- Name: Maturity 1
- Width: 1
- Length: 1
- Click on “Save changes”
- Create the second workstation by following step 5-7 above, but give this the name “Maturity 2”

Step 4: Add two entries to the production plan:
- Click on “Production Plan” in the menu
- Click on “Add production entry” in the top right corner
- In the pop-up enter the following:
- Production ID: Write “Maturity 1”
- Workstation: Choose “Maturity 1”
- Concrete Mix: Choose “Maturity”
- Click on the bottom grey box and flip the button under “Options” to “Manual”
- Click “Save changes”
- Create the second entry in the production plan by following step 2-4, but write “Maturity 2” in the Production ID field and choose “Maturity 2” under Workstation

Step 5: The last preparation in the web portal is to choose a transmitter for each entry:
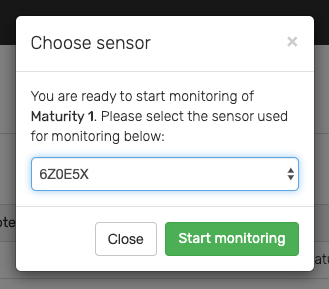
- In the “Production Plan” click on “Choose sensor” to the right of the “Maturity 1” entry
- In the pop-up box, choose one of your Maturix™ transmitters and click on “Start monitoring” – You will have created the first monitoring
- Click on “Production Plan” in the menu and click on “Choose sensor” to the right of the “Maturity 2” entry
- In the pop-up box, choose one of your other Maturix™ transmitters and click on “Start monitoring” – You will have created the other monitoring
- Click on “Dashboard” in the menu. You should now have two monitorings in the top: Maturity 1 and Maturity 2
Prepare and Cure Specimens
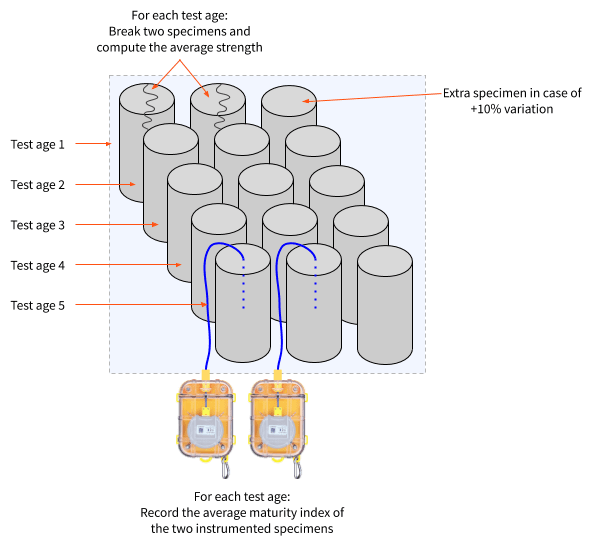
Step 1: Prepare at least 15 specimens, where you embed the type K thermocouples in at least two of the specimens. The tip of the thermocouples must be placed within ±15 mm of the center.
- Once the specimens have been prepared, cure them according to standard procedures (e.g. ASTM C511) and cure all the specimens under the same conditions, e.g. in a water bath or moist room.
- It is important to have the same curing conditions for all the specimens in order to obtain a correct correlation between the strength and maturity.
Step 2: Connect the thermocouples to the Maturix transmitters as soon as possible to start recording the temperature history.
Perform Break Tests
Perform compression tests at minimum five different test ages, e.g. after 6, 9, 12, 15, and 18 hours. The specimens with the thermocouples embedded should be tested last to remain for maturity monitoring.
Step 1: At the first test age, break two specimens and compute the average strength. This improves the reliability of the results. Note down the compressive strength and at what time you did the break tests.
- If the difference between the two tests is higher than 10% from their average, break the third specimen and use the average of the three.
- If you obtain a low test result due to an obviously defective specimen, discard the low test result and use the average of the other two specimens.
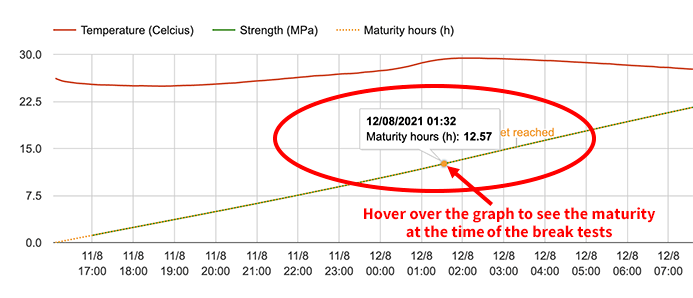
Step 2: Open the Maturix™ Precast web portal to find the calculated maturity:
- Click on “Dashboard” in the menu
- Click on “Maturity 1” to open the report
- Read the maturity by hovering the mouse over the yellow dotted line on the graph. If you performed the break tests at 12:47, find the first maturity point at or just after 12:47 (see image below). Note down the maturity value.
- Click on “Maturity 2” and read the maturity in the same way as above. Note down the maturity value.
- Compute the average maturity index from Maturity 1 and Maturity 2.
You should now know the strength-maturity relationship from your first test age, which is consisting of the average strength (found through break tests) and the average maturity (read in the Maturix™ Precast web portal).
Step 3: Do the above two steps (determining the average strength and average maturity) for the remaining test ages.
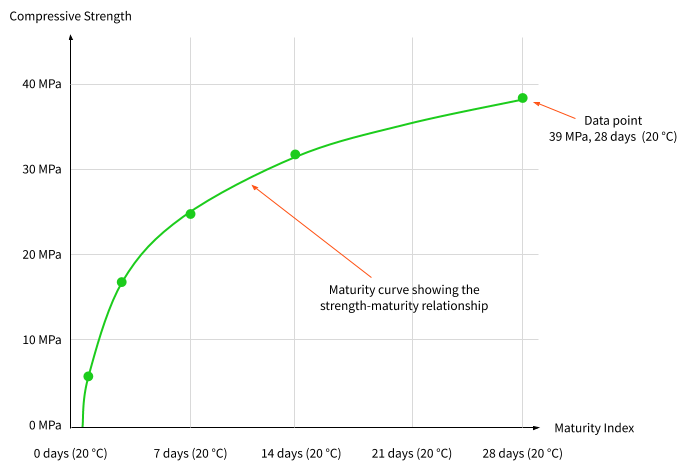
Create Maturity Curve
You should now have at least 5 data points, where each point is the correlation between the compressive strength and the maturity index. This can now be entered into the Maturix™ Precast web portal for strength prediction.
- Click on “Concrete Mixes” in the menu and then click on “New concrete mix” in the top right corner. Fill out the pop-up box:
- Maturity Function: Choose your desired maturity function
- Concrete mix name: Write the name of the concrete mix
- Add the five data points that you just determined by writing the results for each test age in the fields and clicking “Add to dataset”
- The software will automatically draw the curve showing the strength-maturity relationship
- Target Strength: Write the target strength you would like to use as your standard target for this concrete mix
- Final Strength: Write the 28 days strength
- Click “Save” – and you now have added the concrete mix
Validate Test Results
To validate the calibration and maturity curve, make some specimens during the next pour/batch and compare the strength predicted by Maturix™ Precast with the compressive strength results obtained from laboratory break tests.
- If the difference is more than 10%, you should perform a re-calibration and develop a new strength-maturity relationship for the concrete mix.